
In React, server-side rendering (SSR) is a powerful idea with a simple premise: instead of sending a nearly-empty HTML file to your user’s browser and making them wait for JavaScript to load and build the page, the server does all that work upfront. The result? A fully-rendered HTML page arrives in the browser, ready to go.
This simple switch leads to a dramatically faster initial page load and some serious SEO benefits compared to the traditional client-side rendering (CSR) approach. But the fun doesn't stop there. When you pair a speedy SSR frontend with a smart backend, you can modernize your application for the AI era. Imagine serving dynamic, AI-generated content with the same initial speed and SEO-friendliness. That's where tools like Wonderment’s prompt management system come in, giving you the control to build apps that are not just fast, but exceptionally intelligent from the very first click.
Why Server Side Rendering Is a Game Changer for React Apps
So, is server-side rendering just another technical buzzword, or is it actually a critical strategy for your app's success? The answer really comes down to two things every team cares about: user experience and visibility. In a world where attention spans are practically non-existent, the first few seconds of a user's visit are make-or-break.
Think about a standard client-side rendered React app. It sends an almost-empty HTML shell to the browser. The user is stuck looking at a blank screen or a loading spinner while the browser chugs away, downloading, parsing, and executing a massive JavaScript bundle. This delay, often called Time to Content, is frustrating and a one-way ticket to high bounce rates.
The Need for Speed and Visibility
Server-side rendering completely flips this model on its head. The server takes on the initial heavy lifting, building the page into a complete HTML document from the get-go. When a user requests a page, they receive this fully-formed content almost instantly. They see your text, images, and layout right away, which makes for a much, much better first impression.
This approach is a must-have for content-heavy sites, like media outlets or e-commerce stores, where getting information in front of users quickly is the key to keeping them around. The difference is stark: a visitor lands on a product page and sees the product details immediately, rather than staring at a loading icon. That has a direct impact on whether they stick around or bounce.
Beyond speed, SSR delivers a huge advantage for search engine optimization (SEO). Search engine crawlers, like Googlebot, can easily read and index the content of a pre-rendered HTML page. In contrast, client-side rendered apps often throw a wrench in the works for these bots, which might not stick around long enough to execute all the JavaScript needed to see your content.
Server-side rendering is no longer a "nice-to-have" for content-driven sites; it's a fundamental requirement for competing in organic search. An invisible, slow-loading page is effectively a non-existent one in the eyes of both users and search engines.
To put it in perspective, let's break down the core differences.
CSR vs SSR A Quick Comparison
Here’s a snapshot of the key differences between Client-Side Rendering (CSR) and Server-Side Rendering (SSR) across performance, SEO, and user experience.
| Metric | Client-Side Rendering (CSR) | Server-Side Rendering (SSR) |
|---|---|---|
| Initial Load | Slower. Browser downloads a minimal HTML file, then fetches and executes a large JS bundle. | Faster. Browser receives a fully-rendered HTML page, displaying content almost instantly. |
| First Contentful Paint | High. Users see a blank page or a loader for a noticeable period. | Low. Meaningful content is visible to the user very quickly. |
| SEO | Challenging. Search engine crawlers may struggle to index content hidden behind JavaScript. | Excellent. Content is present in the initial HTML, making it easy for crawlers to read and index. |
| Server Load | Lower initial server load, as the client's browser handles the rendering. | Higher server load, as the server renders the page for each initial request. |
| User Experience | Can feel slow and clunky on the first visit, but subsequent navigation is fast. | Great first impression, but navigation can feel slower without a proper client-side hydration strategy. |
This table makes it clear why so many teams are making the switch. SSR provides a superior initial experience, which is crucial for both users and search engines.
Unlocking SEO and Performance Gains
The impact on search rankings isn't just theory. Real-world benchmarks have shown that server-side rendering (SSR) with React can deliver up to a 20% better ranking on search engines compared to pure client-side setups. You can dig into more of these React statistics and their development impact to see the numbers for yourself. This boost comes from better crawlability and making dynamic content immediately available to bots—a crucial edge for any business relying on organic traffic.
But the benefits of a robust backend don't stop at rendering. Think about modernizing your application with a powerful toolkit, like a dedicated prompt management system. Imagine rendering dynamic, AI-driven content—like personalized product recommendations or custom-generated user guides—directly on the server. This ensures that even your most advanced, intelligent features are delivered with that same initial speed and SEO-friendliness.
By connecting your SSR framework to a tool like Wonderment’s prompt management system, you can build applications that aren’t just fast, but exceptionally smart from the very first click.
Choosing Your SSR Framework: Next.js vs. Remix
So, you're sold on server-side rendering with React. Smart move. Now comes the big question: how do you actually implement it? Thankfully, you don't have to build an SSR system from the ground up. The React ecosystem has some heavy hitters that handle the tough parts for you, with two frameworks leading the charge: Next.js and Remix.
Choosing between them isn't as simple as ticking off features on a list. It’s about digging into their core philosophies and seeing which one aligns with your project, your team, and your long-term goals. Both are fantastic tools, but they solve problems from different angles. This decision will define your development experience for years to come.
Before you even get to the framework, the first real choice is whether SSR is the right path for your specific app. It often comes down to how important that initial page load and SEO are.
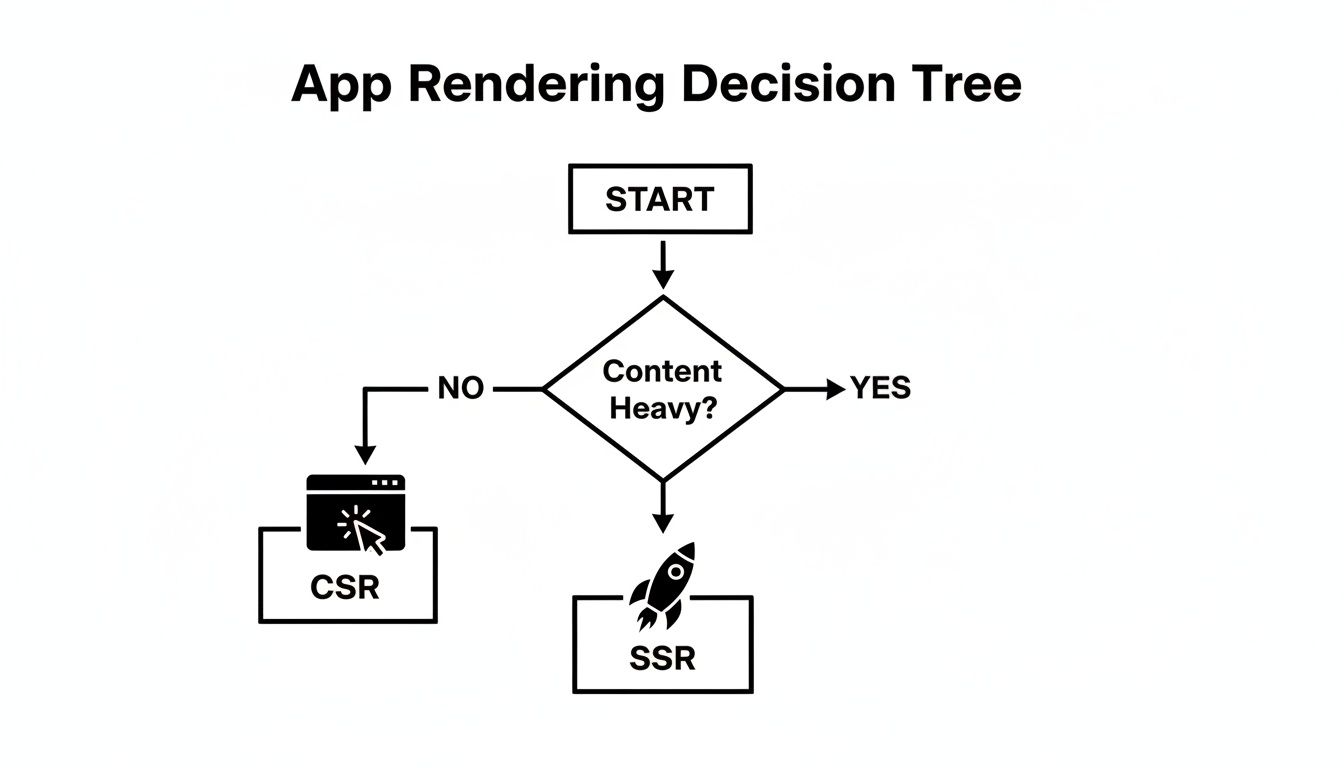
This visual really gets to the heart of it: for apps heavy on content where you need search engines and users to see something fast, SSR is a no-brainer. Once you've made that call, you're ready to pick your tool.
Next.js: The Versatile Powerhouse
Next.js, brought to you by the team at Vercel, is the established giant in the React framework world. If you've looked into production-grade React, you've heard of it. Its main strength is its sheer flexibility and a feature set that covers just about any scenario you can think of.
What really makes Next.js stand out is its hybrid rendering model. You’re not locked into a single approach; you can pick the best rendering strategy for each and every page.
- Server-Side Rendering (SSR): This is your go-to for pages with dynamic, user-specific data that has to be fresh. Think user dashboards or e-commerce search results.
- Static Site Generation (SSG): Perfect for content that rarely changes—blog posts, marketing pages, documentation. These pages are built once at compile time, making them incredibly fast.
- Incremental Static Regeneration (ISR): This is the magic middle ground. It lets you rebuild static pages on a timer, so your content stays fresh without a full-site redeployment.
This "choose your own adventure" style of rendering makes Next.js a beast for large, complex applications. You can have a blazing-fast marketing site built with SSG living right alongside a dynamic, server-rendered application, all in the same project. The massive community and top-tier documentation don't hurt, either.
Remix: A Focus on Web Fundamentals
Remix comes at the problem from a different angle. Created by the minds behind React Router, it’s all about embracing and extending web standards. The philosophy here is to use the power of the browser and HTTP to their absolute fullest potential.
Where Remix truly shines is in how it handles data. It simplifies data loading, mutations, and form submissions by leaning on standard form elements and HTTP methods (GET, POST, etc.). When a user submits a form, Remix takes care of the data re-fetching and UI re-validation automatically. You can often skip writing a ton of client-side state management logic.
By building on top of the web platform's existing strengths, Remix lets you create resilient, fast, and progressively enhanced user experiences with less JavaScript and less boilerplate code. It’s a simple but incredibly powerful idea.
Its nested routing system is another game-changer. Routes nest inside one another, letting parent routes handle the layout while child routes manage their own content and data. This not only cleans up your code but also makes data fetching more efficient, as different parts of the UI can load their data in parallel. For business apps that demand a solid UI, getting familiar with different user interface frameworks and their philosophies is a huge advantage.
Head-to-Head: A Practical Comparison
So, how do you actually pick one? There's no single "best" choice—it all boils down to your project's specific needs. Let's break down where each framework really shines.
Next.js vs. Remix Core Feature Breakdown
This table compares the core philosophies of Next.js and Remix to help you see which one might be a better fit for your next project.
| Feature | Next.js | Remix |
|---|---|---|
| Data Fetching | Flexible, with getServerSideProps for SSR and getStaticProps for SSG. More focused on page-level data. |
Integrated with routes via loader functions. Excels at parallel data loading with nested routes. |
| Forms & Mutations | Typically requires client-side state management (e.g., React Hook Form, state variables) for submissions and pending states. | Built-in form handling using web standards. Simplifies submissions, error handling, and data re-validation. |
| Rendering Strategy | Highly versatile with SSR, SSG, and ISR. You choose the best fit for each page. | Primarily focused on SSR but can pre-render routes. Optimizes for a fast and dynamic server response. |
| Best For | Large, content-rich sites with diverse rendering needs (e.g., a platform with a blog, marketing pages, and a dynamic app). | Data-intensive applications with complex user interactions and forms (e.g., dashboards, CRMs, social media sites). |
The best way to decide is to take them for a spin. Build a small prototype with both. Do you find yourself leaning toward the flexible rendering options in Next.js? Or does Remix's approach to data and forms just click with how your team likes to work? The right choice is the one that lets you build better and faster.
Getting Your Hands Dirty with a Next.js SSR App
Talking about the benefits of server-side rendering in React is one thing, but you’ll only truly get it once you build something yourself. Let's roll up our sleeves and spin up a functional, server-rendered application with Next.js, the go-to framework for this kind of work. We'll go from a blank folder to a working SSR app, hitting all the core concepts you'll use daily.
We're going to cover the whole nine yards: project setup, creating pages, fetching data on the server using getServerSideProps, and even tackling dynamic routes. These are the absolute essentials for building real-world applications.
Initial Project Setup
Getting a Next.js project off the ground is surprisingly quick, all thanks to its slick command-line interface (CLI). Just pop open your terminal and run this command:
npx create-next-app@latest my-ssr-app
The CLI will fire off a few questions about how you want to configure the project. For now, just go with the defaults. Once it finishes, jump into your new project directory (cd my-ssr-app) and kick off the development server.
npm run dev
And that's it! You've got a live Next.js application humming away on your machine. This command fires up a local server with hot-reloading built-in, which means any code change you save will instantly show up in the browser.
Creating Your First Pages
One of the best things about Next.js is its file-based routing system. It's incredibly intuitive—the folder structure in your app directory maps directly to the URLs of your site.
Let’s put this to the test by creating two pages: a simple, static "About" page and a more dynamic "Posts" page that needs to fetch some data.
- Make an About Page: Inside the
appdirectory, make a new folder calledabout. Inside that new folder, create a file namedpage.js. Just by creating that file, you've automatically created the/aboutroute. - Add some content: Open up
app/about/page.jsand drop in a basic React component.
export default function AboutPage() {
  return (
    <div>
      <h1>About Our Company</h1>
      <p>This is a statically rendered page in our Next.js application.</p>
    </div>
  );
}
This page is dead simple. Since it doesn't need to fetch any data from an API, Next.js can pre-render it as pure static HTML at build time, making it lightning-fast to load.
Fetching Data on the Server
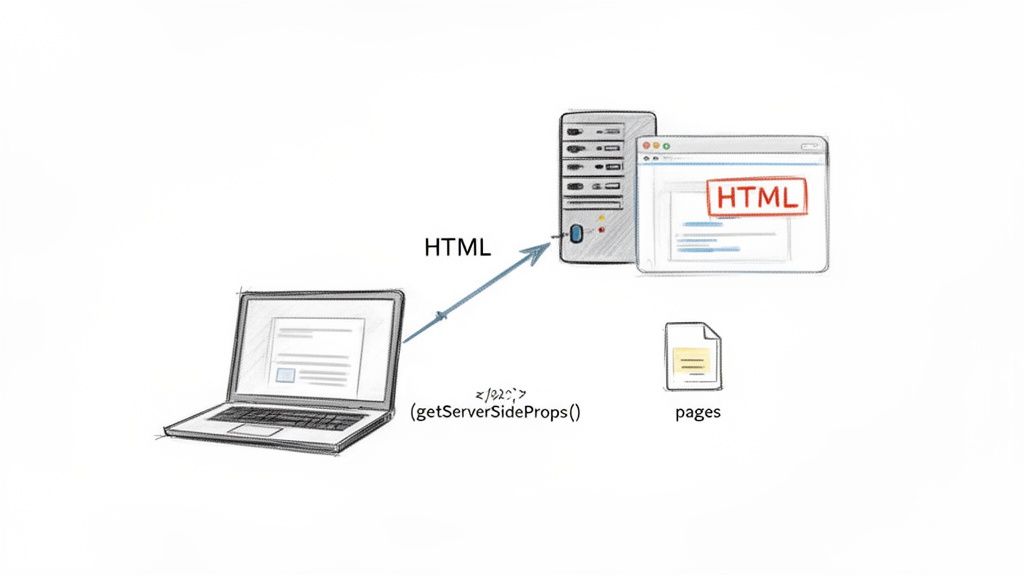
Okay, now for the main event: server-side rendering with dynamic data. This is where the real power of SSR shines. We'll create a page that fetches a list of blog posts from an external API every single time a user requests it.
Next.js has a special function just for this: getServerSideProps. When you export this async function from a page component, Next.js knows to run it on the server before sending any HTML to the browser. The data this function returns gets passed right into your component as props.
Let's make a new page to show off these posts. Inside the app directory, create a posts folder, and within that, a page.js file.
// app/posts/page.js

// This function runs on the server for every request
export async function getServerSideProps() {
  const response = await fetch('https://jsonplaceholder.typicode.com/posts?_limit=10');
  const posts = await response.json();

  // The 'posts' data will be passed to the page component as props
  return {
    props: {
      posts,
    },
  };
}

// This component receives the 'posts' prop from getServerSideProps
export default function PostsPage({ posts }) {
  return (
    <div>
      <h1>Latest Posts</h1>
      <ul>
        {posts.map((post) => (
          <li key={post.id}>
            <h3>{post.title}</h3>
            <p>{post.body}</p>
          </li>
        ))}
      </ul>
    </div>
  );
}
Now, when someone visits /posts, the server grabs the latest post data, injects it into the component to generate the final HTML, and then sends that fully-formed page to the browser. Both users and search engine crawlers see the content instantly.
Handling Dynamic Routes
Most real applications need dynamic routes—think /posts/1 or /products/cool-gadget. Next.js makes this a breeze. To create a dynamic segment, you just wrap a folder name in square brackets, like [id].
Let's build a page to display a single post.
-
Create the dynamic route file: Inside your existing
app/postsdirectory, create a new folder named[id]. Inside that folder, create anotherpage.jsfile. The final path will look like this:app/posts/[id]/page.js. -
Fetch and display single post data: This page will also use
getServerSideProps, but with a twist. The function receives acontextobject that contains useful information, including aparamsobject with the route's dynamic parts—in our case, theid.
// app/posts/[id]/page.js

export async function getServerSideProps(context) {
  const { id } = context.params;
  const response = await fetch(`https://jsonplaceholder.typicode.com/posts/${id}`);
  const post = await response.json();

  return {
    props: {
      post,
    },
  };
}

export default function SinglePostPage({ post }) {
  return (
    <div>
      <h1>{post.title}</h1>
      <p>{post.body}</p>
    </div>
  );
}
With that in place, navigating to /posts/1 fetches and displays the first post, /posts/2 gets the second, and so on. Every single one of these pages is rendered on the server with its own specific data, delivering a perfectly optimized experience every time. You now have the fundamental building blocks for a complete server-side rendering React application.
Optimizing Performance and User Experience in SSR
Getting your server-side rendering React app up and running is a fantastic milestone, but the real work starts now. Launching is just the beginning; ensuring your application is fast, responsive, and can handle real-world traffic is what separates a good user experience from a great one. This is where we need to move beyond the basics and into practical, advanced optimization techniques.
The goal is simple: keep your app feeling snappy, not just on the initial load but with every single interaction. We'll dig into powerful caching strategies to slash server response times, implement smart code-splitting to minimize the client-side footprint, and even peek into the future of React performance with Server Components.
Mastering Caching Strategies
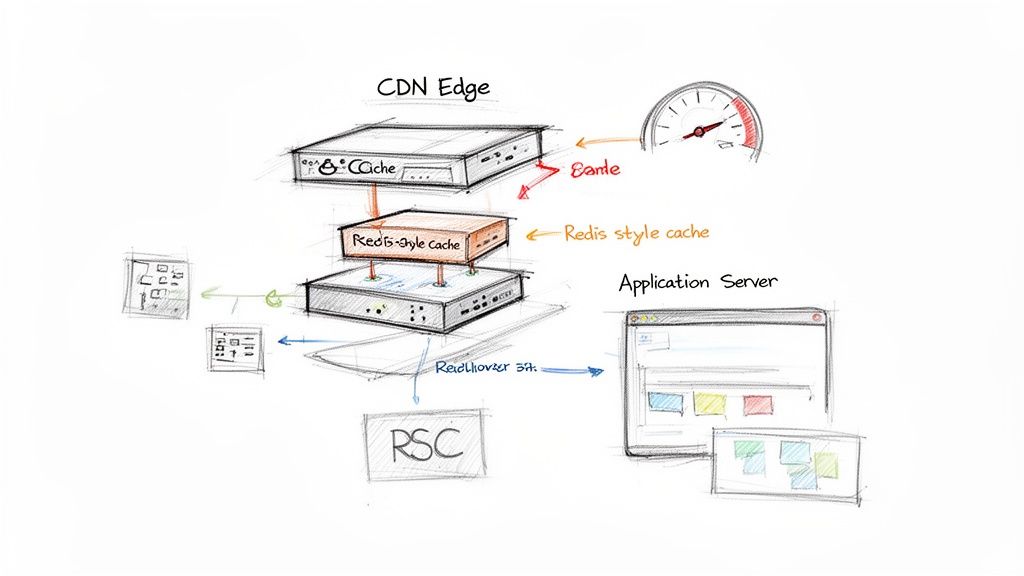
Every time a user requests a page, your server has to do a fair bit of work: fetch data, render components, and construct an HTML document. Caching is the art of doing that work just once, then storing the result for future requests. It’s a game-changer for reducing server load and delivering near-instant responses.
For pages that don't change very often—think product category pages or blog archives—you can introduce a caching layer.
- In-Memory Caching: This is the most straightforward approach. Using libraries like
memory-cache, you can store rendered HTML directly in your server's memory for a short time. It's incredibly fast but isn't scalable across multiple server instances. - Distributed Caching (Redis): For more robust applications, a dedicated caching server like Redis is the way to go. Your application server renders a page, stores the HTML in Redis with a specific key (like the URL), and sets an expiration time. Subsequent requests hit Redis first, completely bypassing the expensive rendering process.
Implementing a solid caching strategy is a direct investment in https://www.wondermentapps.com/blog/improving-application-performance/. A well-designed cache can be the difference between an app that buckles under load and one that scales effortlessly.
Code Splitting and Lazy Loading
So, SSR got the initial HTML to the user quickly. Great. But what happens next? The browser still has to download and execute the JavaScript needed to make the page interactive—a process we call hydration. If your JavaScript bundle is massive, users face that frustrating moment where the page looks ready but isn't clickable.
This is where code splitting saves the day. Instead of one giant JavaScript file, you break your code into smaller, logical chunks. Frameworks like Next.js do a lot of this for you automatically, on a per-page basis.
You can take this a step further with dynamic imports for components that aren't immediately visible on the screen. This technique, known as lazy loading, is perfect for elements "below the fold."
import dynamic from 'next/dynamic';

const HeavyComponent = dynamic(() => import('../components/HeavyComponent'), {
  loading: () => <p>Loading...</p>,
});

export default function MyPage() {
  return (
    <div>
      <h1>My Page Content</h1>
      {/* HeavyComponent is only loaded when it's needed */}
      <HeavyComponent />
    </div>
  );
}
This simple change ensures the browser only downloads the code for HeavyComponent when it's about to be rendered, keeping your initial bundle lean and mean. To really sharpen your understanding, it’s worth consulting this comprehensive Core Web Vitals & page experience playbook.
Optimizing for performance isn't just about making things faster; it's about respecting the user's time and device capabilities. A smaller initial JavaScript payload directly translates to a better Core Web Vitals score and a more satisfying user experience.
The Next Frontier: React Server Components
Perhaps the most significant evolution in React performance is the rise of React Server Components (RSCs). It's crucial not to confuse them with the server-side rendering we've been discussing. While traditional SSR renders components on the server to produce HTML, it still sends the component's JavaScript to the client for hydration.
RSCs are different. They run exclusively on the server and never send their JavaScript to the client. This is a huge deal. It means you can create components that access databases or internal APIs directly without ever exposing that logic or adding a single byte to the client-side bundle.
The performance implications are massive. Recent benchmarks show that React Server Components, maturing fully by late 2026, can slash initial load times by an average of 38%. By rendering static UI parts on the server without shipping the corresponding JavaScript, this approach can also cut bandwidth usage by up to 30%.
Let's imagine a product page with a static description, user-specific reviews, and an interactive "add to cart" button.
- The product description can be an RSC, rendered on the server with zero client-side JavaScript.
- The reviews section can also be an RSC, fetching personalized data for the logged-in user.
- The "add to cart" button would be a traditional "Client Component" because it needs state and event handlers to function in the browser.
This hybrid model gives you the best of both worlds: the raw power of a server-centric architecture combined with the rich interactivity of a client-side React app, all with a minimal JavaScript footprint. As frameworks like Next.js integrate RSCs more deeply, they are quickly becoming a standard tool for building high-performance web applications.
Scaling Your SSR App for an AI-Powered World
So, you've built a fast, SEO-friendly SSR React app. That's a huge win. But what's next? What happens when your audience explodes globally, or when you need to weave real intelligence into the user experience? This is where the magic happens—connecting a high-performance frontend to a smart, modern backend to get your application ready for what's to come.

Modern Deployment for Global Reach
Let's face it, traditional server setups can quickly become a bottleneck when you're growing. Modern deployment strategies for SSR apps are all about closing the distance between your code and your users to slash latency.
Two approaches, in particular, are game-changers:
- Serverless Functions: Think of platforms like AWS Lambda or Vercel Functions. They let you run your SSR logic on demand. Instead of a server that's always on, you only pay for the compute time you actually use. It’s an incredibly cost-effective way to handle those unpredictable traffic spikes.
- Edge Computing: This takes serverless to the next level by deploying your rendering functions across a global network of "edge" locations. When a user in Tokyo requests your page, the render happens in a nearby data center, not one halfway across the world in North America. The result is a consistently fast experience for every user, no matter where they are.
As you plan to scale, getting familiar with different software architecture patterns, like microservices or event-driven design, can give you a solid roadmap.
Integrating AI for a Smarter Backend
A fast app is great, but a smart app is what really creates a standout experience. By integrating AI, you can generate dynamic, personalized content on the fly. But with this power comes complexity. Managing this new layer is critical for maintaining control and consistency, which is why a dedicated prompt management system becomes an essential piece of your toolkit.
It acts as the central command center for your app's AI features. For any business leaders wanting to dig deeper, understanding how to leverage artificial intelligence is a great place to start.
By centralizing your AI logic, you ensure every server-rendered response—whether it's a product description, a personalized welcome message, or a data summary—is consistent, on-brand, and efficient.
The Power of a Prompt Management Toolkit
A system like Wonderment’s gives you the structured control needed to bring AI into a production SSR environment without the chaos. It’s not just about firing off a request to an AI model; it's about managing the entire lifecycle from start to finish. This is the kind of administrative tool that developers and entrepreneurs can plug into an existing app to modernize it for AI integration.
Here’s how the core components can supercharge your SSR app:
- Prompt Vault with Versioning: You can store, test, and version all of your AI prompts. This is huge. It means a prompt fine-tuned for marketing copy won't get mixed up with one for technical support. And if a new version doesn't perform well, you can just roll it back.
- Parameter Manager: This is how you securely connect your AI prompts to your internal database and other data sources. You can pull in user-specific details—like purchase history or account info—and inject them into a prompt to generate truly personal content, all rendered on the server without ever exposing sensitive data.
- Integrated Logging & Cost Management: Get a single, unified view of every AI interaction. The logging system tracks every prompt and response across all integrated AIs, which is a lifesaver for debugging and auditing. At the same time, the cost manager provides a real-time dashboard of your cumulative spend, so you never get hit with a surprise bill.
By pairing a fast server side rendering React frontend with an intelligent, well-managed backend, you’re not just building an application for today's users. You're building one that's ready to scale for the AI-driven opportunities of tomorrow.
Common Questions About Server Side Rendering in React
Even with a clear path forward, a few questions always seem to pop up when you're adopting a new way of building things. When it comes to implementing server side rendering with React, both business leaders and developers tend to run into the same hurdles. Let's tackle some of the most frequent ones with straightforward answers.
When Should I Choose SSR Over Static Site Generation?
You’ll want SSR when your content is highly dynamic or personalized for each user. Think of things like a social media feed, a custom user dashboard, or an e-commerce site where inventory and prices change in real time. SSR builds the page on the server for every single request, which guarantees the content is always fresh.
On the flip side, Static Site Generation (SSG) is the champion for content that rarely changes. This is perfect for blogs, marketing sites, or documentation. SSG builds all the pages when you compile the site, making for incredibly fast load times. The only trade-off is that you need to rebuild the site to push content updates live.
Does SSR Hurt the Interactivity of a React App?
Not if it's done right. The whole point of SSR is to crush that initial page load time and give your SEO a boost by sending a fully-rendered HTML page from the server first. As soon as that page lands in the browser, a process called hydration kicks in. This is the magic moment where React "wakes up" on the client's device, attaches all the event listeners, and makes the page fully interactive.
Modern frameworks like Next.js are engineered to make this handoff completely seamless. You really get the best of both worlds: a lightning-fast initial load followed by the rich, fluid experience people expect from a single-page application.
How Does SSR Affect Hosting and Infrastructure Costs?
This is a totally valid concern. SSR requires a running Node.js server to render pages on demand, which is naturally more resource-intensive than just serving static HTML files. This can lead to higher infrastructure costs compared to an app that only renders on the client's browser.
However, the hosting landscape has changed a lot with modern "serverless" platforms.
- On-Demand Compute: Services like Vercel or AWS Lambda let you run your SSR logic on a per-request basis. This is often incredibly cost-effective because you only pay for the compute time you actually use, instead of paying for a server to sit idle.
- Caching is Key: A smart caching strategy is your absolute best friend for keeping costs and server load under control. By caching frequently accessed pages, you can serve them instantly without ever hitting the Node.js server, which drastically cuts down your compute needs.
So, while there is a server cost, modern tools and smart strategies make scaling a server side rendering React application far more manageable and affordable than it used to be.
At Wonderment Apps, we specialize in building high-performance applications that are not only fast but also intelligent and ready to scale. If you're looking to modernize your software with AI and need a robust backend to power your SSR frontend, our prompt management toolkit can provide the control and consistency you need.
See how it works and schedule a demo at https://wondermentapps.com.